Cómo usar el rallador de queso rotatorio Geedel: una guía completa paso a paso
A la hora de preparar queso, verduras o frutos secos, el rallador de queso giratorio Geedel hace que el trabajo sea más rápido, seguro y mucho más agradable. Esta versión mejorada cuenta con entradas y salidas más anchas, cuchillas de acero inoxidable más afiladas, un mango patentado y una base de succión reforzada. Para obtener el mejor rendimiento y la mayor vida útil de su rallador, aquí tiene una guía completa que incluye consejos de montaje, uso, limpieza y solución de problemas comunes.
1. Comprensión de las partes
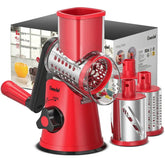
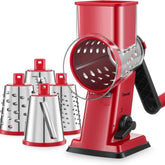
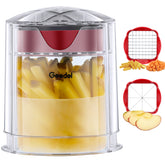
Antes de comenzar, familiarícese con los componentes principales. El rallador incluye cuatro cuchillas intercambiables de acero inoxidable: corte grueso, corte fino, rebanado y corte ondulado. Incluye una manivela patentada, un empujador de alimentos para mantener los dedos alejados de las cuchillas y una base de succión reforzada para mantener la unidad estable sobre la encimera. Todas las piezas son desmontables para facilitar su limpieza.
2. Preparación para el uso
Comience por comprobar que todas las piezas estén limpias y secas. Si es la primera vez que usa el rallador o si no lo ha usado durante un tiempo, enjuague las cuchillas y el cuerpo con agua tibia y jabón y séquelos bien.
Elija una superficie lisa, limpia y seca para fijar la base de succión; el vidrio, la piedra pulida o una encimera lisa son las mejores opciones. Evite las superficies irregulares o grasosas, ya que reducen la potencia de succión.
Si va a rallar quesos blandos o húmedos, como mozzarella o brie, colóquelos en el congelador durante unos 10 a 15 minutos antes de rallarlos. Esto ayuda a que se endurezcan y evita que se obstruyan o se peguen dentro del tambor.
3. Montaje
El montaje es rápido y sencillo. Coloque la base de succión sobre la superficie elegida y fíjela firmemente. Seleccione la cuchilla que desee usar, introdúzcala en el cuerpo principal del rallador y asegúrese de que esté correctamente alineada. Fije la manivela firmemente al eje de la cuchilla para que gire suavemente. Finalmente, tenga listo el empujador de alimentos para guiar los ingredientes con seguridad a través de la entrada.
4. Cómo utilizar el rallador
Corte los alimentos en trozos lo suficientemente pequeños como para que quepan en la entrada ancha. Coloque un tazón o plato debajo de la salida para recoger la ralladura. Introduzca los alimentos en la entrada y presiónelos suavemente con el empujador de alimentos. Mientras sujeta la base firmemente con una mano, use la otra para girar la manivela. Gírela a un ritmo constante en lugar de forzarla rápidamente; esto produce tiras o rebanadas más uniformes.
Si necesita una textura diferente, simplemente deténgase, retire el mango, cambie la cuchilla y vuelva a ensamblar antes de continuar. Las cuatro cuchillas incluidas le ofrecen una gran flexibilidad para cortar queso, zanahorias, pepinos, calabacines, papas, nueces y más.
5. Limpieza y almacenamiento
Después de usarlo, desmonte siempre el rallador para limpiarlo correctamente. Retire el mango, la cuchilla, el empujador de alimentos y la carcasa principal. Enjuague las piezas con agua tibia corriente o colóquelas en la rejilla superior del lavavajillas. Asegúrese de retirar todos los restos de comida, especialmente del interior de las cuchillas del tambor, donde pueden acumularse residuos.
Deje que todo se seque completamente antes de guardarlo para evitar la oxidación y los malos olores. Las cuatro cuchillas se pueden apilar para ahorrar espacio, y el cuerpo del rallador es lo suficientemente compacto como para caber en la mayoría de los armarios de cocina.
6. Consejos de seguridad
Utilice siempre el empujador de alimentos, y nunca los dedos, para presionar los ingredientes en el rallador. Las cuchillas son afiladas y pueden causar lesiones si se manipulan sin cuidado. Asegúrese de que la base de succión esté bien cerrada antes de cada uso para que el rallador no se deslice durante el funcionamiento. Al lavar las cuchillas, manipúlelas con cuidado y considere usar guantes protectores para evitar cortes accidentales.
7. Solución de problemas comunes
Si la base de succión no se adhiere correctamente, limpie tanto la encimera como la ventosa con un paño húmedo y vuelva a intentarlo sobre una superficie más lisa.
Si la comida obstruye el tambor, deténgase, retire la cuchilla y enjuáguela antes de continuar. Los quesos blandos se rallan mejor después de enfriarlos.
Si el mango se siente rígido, compruebe que la cuchilla esté bien insertada y que no haya restos de comida atascados entre las piezas. Aplicar una pequeña cantidad de lubricante alimentario en el eje puede ayudar a mantener una rotación suave.
8. Consejos profesionales para obtener mejores resultados
Para los quesos blandos, enfríelos siempre ligeramente antes de rallarlos.
Para cocinar en grandes cantidades, ralle más de lo que necesite y guarde el sobrante en el refrigerador o el congelador para usarlo rápidamente más tarde.
Alterne los estilos de cuchilla para crear texturas en capas en sus recetas, como combinar tiras finas con rodajas onduladas para ensaladas o guisos.
Corte los ingredientes en trozos iguales antes de rallarlos para reducir la tensión en las cuchillas y hacer que el proceso sea más suave.
Conclusión
El rallador de queso giratorio Geedel está diseñado para que la preparación de alimentos sea más rápida, segura y versátil. Con sus afiladas cuchillas de acero inoxidable, su base de succión segura y su diseño fácil de limpiar, es una herramienta esencial tanto para los amantes del queso como para los cocineros caseros. Siguiendo los pasos anteriores (preparar, ensamblar, rallar, limpiar y almacenar), disfrutará de excelentes resultados de forma constante y prolongará la vida útil de su rallador.


