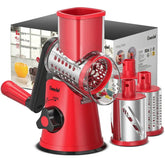
How to Use Your Geedel Rotary Cheese Grater — Complete Setup & Safety Guide
Looking to make the most out of your Geedel Rotary Cheese Grater with suction base?
This easy step-by-step tutorial will help you assemble, install, and clean your rotary grater correctly — so you can enjoy smooth, safe, and efficient grating every time.
Step 1: Unboxing & Preparation
Before your first use:
Unpack all parts — the main body, suction base, handle, food pusher, drums (blades), and any interchangeable inserts.
Wash all removable parts (except the base) with warm water and mild dish soap. Rinse thoroughly and dry with a soft cloth.
Choose a flat, smooth, clean surface for installation. The suction base only works properly on surfaces free of oil, crumbs, or excessive water.
Tip: Avoid textured, uneven, or porous countertops — the suction may not hold securely.
Step 2: Setting Up the Suction Base
The suction base is what keeps your grater firmly attached to the countertop during use. Follow these steps for a secure grip:
Place the grater on a smooth and dry surface (like marble, granite, glass, or polished tile).
Make sure the surface is free of oil or water — wipe it clean with a dry towel if needed.
Press the grater’s base firmly down to ensure full contact.
Locate the locking knob or lever beside the base.
Turn the knob clockwise to engage the suction and lock it in place.
Now the grater should feel firmly attached — try gently tugging it to confirm stability.
If it slides, repeat the process on a cleaner, drier surface.
Step 3: Installing the Handle and Drum
Choose your preferred blade drum (slicing, shredding, fine shredding, or wavy slicing).
Slide the drum into the food chamber, aligning the drum’s groove with the slot inside the main body.
Insert the handle into the exposed end of the drum. Make sure the handle’s connector matches the groove on the drum’s axle.
Push the handle straight in until you hear or feel a slight click — that means it’s securely attached.
Rotate the handle a few times to ensure smooth movement and correct alignment.
Step 4: Grating Like a Pro
Once your grater is securely fixed and assembled, place your food (cheese, chocolate, nuts, or veggies) into the hopper.
Use the food pusher to gently press ingredients toward the drum — never use your fingers!
Rotate the handle steadily in one direction to grate or slice your ingredients.
Collect the shredded food from the output area — quick, clean, and safe.
Tip: For best results, use firm ingredients. Very soft or wet foods (like fresh mozzarella) may stick to the drum. Lightly chilling them first can improve performance.
Step 5: Disassembly & Cleaning
Release the suction base by turning the knob counterclockwise and lift the grater off the surface.
Remove the handle and pull out the drum.
Rinse all removable parts under warm water immediately after use to prevent buildup.
All detachable parts are dishwasher-safe, but use air-dry or heatless drying mode, not heated drying, to prevent plastic deformation.
Dry thoroughly before reassembling or storing.
Safety & Maintenance Tips
Always ensure the suction base is properly locked before use.
Do not use on oily, wet, or rough surfaces — suction will not work properly.
Keep fingers away from the blades. Always use the food pusher.
Avoid grating overly soft cheese or moist vegetables directly — chill or pat dry first.
Never use harsh brushes or scouring pads on stainless blades; use a soft brush or sponge.
Regularly inspect the suction pad and blades for wear. Replace if deformed or dull.
Store the grater in a dry place, and keep blades separated to prevent damage.
Do not leave the suction base locked to the counter for long periods — it may lose elasticity.
Extra Tips for Better Use
Grate larger portions at once and store them in airtight containers — saves time later.
Mix and match blades for different textures: fine for cheese, coarse for veggies, wavy for garnishes.
For a smoother experience, apply gentle, steady pressure instead of forceful pushing.
Take photos of the setup during your first use — it’ll make reassembly a breeze later.
Final Thoughts
With proper setup and care, your Geedel Rotary Cheese Grater will stay steady, efficient, and ready for everyday cooking.
From parmesan to nuts to chocolate shavings — this tool makes food prep faster, cleaner, and much more fun!


